

Let’s make a microwaveable bowl cozy!
Bowl cozies are honestly something I never know I needed until I made a batch - now I use them all the time!
When heating in the microwave, you need to ensure that you are only using natural fibres, this includes your batting (100% cotton with no scrim) and your thread (including your bobbin thread). In this tutorial I am using a cotton/linen blend as my outer fabric, Pellon wrap‘n zap cotton batting and Gütermann cotton thread.
Materials needed for one bowl cozy:
- 2 x 10” squares of fabric
- 2 x 9.5" squares of 100% cotton batting with no scrim
- Coordinating (or not, you do you) cotton thread
- Fabric marking pen

Let's get started!
- Centre and pin your batting squares to the wrong side of your fabric squares.
- Draw diagonal lines corner to corner. It’s easier if you don’t pin directly on those diagonals.

- Stitch across the diagonal lines.

- Fold stitched squares in half, right sides together. We are repeating all of the same steps on both squares.
- To make the darts, mark a point 2” down your fold and 1” across. Draw a line between the two points and pin. Repeat for the other/bottom end.

- Sew on those two marked lines
- Trim corners off. Leave about 1/8” seam allowance

- Fold squares in the opposite direction, mark 2" down the fold and 1" over, draw a line, pin and stitch on the line. Repeat for the other/bottom end

- Trim corners off. Leave about 1/8" seam allowance.
- Now you should be able to form two bowl shapes. Turn one right side up, the other batting side up.

- Place them right sides together and pin or clip (or both) all around. Make sure darts and corners are lined up. Mark a 2.5-3" "no-sew" gap for turning. Mine is the orange clip

- Now let's sew! Use a 1/4" seam allowance. Slow down when you are sewing over the darts, even though we have trimmed the batting, there is still a lot of bulk. Pivot at the corners, don't forget to leave your gap for turning, backstitch at both sides of the gap.
- Clip your corners to reduce bulk, being careful not to cut through your stitches

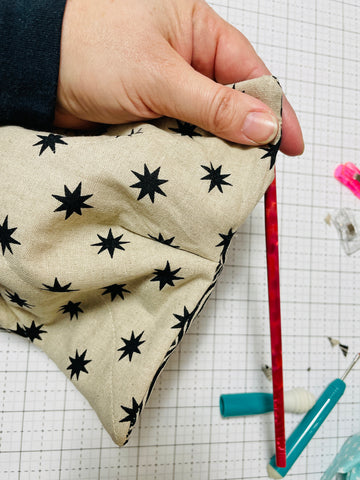
- Turn right side out! It's fiddly. Take your time. If you didn't leave a large enough gap to be able to turn it without colourful language, pick out a couple of stitches. Sigh

- We're almost there! Gently push out your corners
- Shape bowl and give it a quick iron. Pin or clip your turning gap neatly.
- Topstitch using a 1/8" seam, ensuring gap is closed.

- Ta-daaaa! You are done!
